The Building Jig-Click to see full size
Creating
the Turk's Head
The
Building Jig-Click to see full size
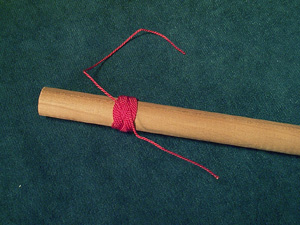
The Turk's head is a decorative knot used to reprsent the Dharma Seeds. Out of these turk's head knots the horsehair streams, representing the Dharma teaching.
 We
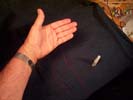
begin by selecting a one-meter length of .020" bead cord
(Griffin's Polyamid #8).
Dip about 1/2" of the ends into cyano-acrylic glue. This
will seal the cut ends against ravelling, and also form a handy
self-needle to help tucking the cord into the knot. Fold it over
the left hand (or right, if you are left-handed) so the two legs
are of equal length.
We
begin by selecting a one-meter length of .020" bead cord
(Griffin's Polyamid #8).
Dip about 1/2" of the ends into cyano-acrylic glue. This
will seal the cut ends against ravelling, and also form a handy
self-needle to help tucking the cord into the knot. Fold it over
the left hand (or right, if you are left-handed) so the two legs
are of equal length.
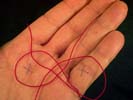
 Bring
the end from the leg behind your hand and create a second loop.
Lie the loop flat on the palm and capture its end between your
index and ring fingertips. Note that the end of the loop lies
under its beginning, not over.
Bring
the end from the leg behind your hand and create a second loop.
Lie the loop flat on the palm and capture its end between your
index and ring fingertips. Note that the end of the loop lies
under its beginning, not over.
 Continue by bringing the other standing end of the line and passing under the end being grasped between your fingertips, and alternating over and under the other members of the loop, as shown. Pass the other standing end under the loop on the other side of your hand (not shown) to complete the knot's set-up.
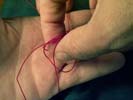
 Next we
will pick up the results and remove it from the left hand. The
pick will occur in the two loops marked with ink X on my hand,
using two fingers as illustrated at right.
Next we
will pick up the results and remove it from the left hand. The
pick will occur in the two loops marked with ink X on my hand,
using two fingers as illustrated at right.

 We pick up
the knot formed thus far and work the slack out of it, as shown
at right.
We pick up
the knot formed thus far and work the slack out of it, as shown
at right.
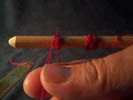
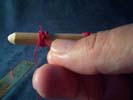
 Then we
place it on a short piece of 3/8" dowel. This will be our
working form for finishing the turk's head. Our next step is to
work more slack out of the knot by inserting a pair of tweezers
or some such tool (Sailors use a fid or marlin spike for such
work--at a far larger scale!) under the windings of the knot and,
grasping the two ends, pull and working back and forth. We want
a bit of slack left in so that more cord can be worked into the
knot. Experience will teach you just how much slack to leave in.
It's best to get a good balance now, as it will become progressively
more laborious to work out all slack as the knot receives the
two more turns needed to complete it.
Then we
place it on a short piece of 3/8" dowel. This will be our
working form for finishing the turk's head. Our next step is to
work more slack out of the knot by inserting a pair of tweezers
or some such tool (Sailors use a fid or marlin spike for such
work--at a far larger scale!) under the windings of the knot and,
grasping the two ends, pull and working back and forth. We want
a bit of slack left in so that more cord can be worked into the
knot. Experience will teach you just how much slack to leave in.
It's best to get a good balance now, as it will become progressively
more laborious to work out all slack as the knot receives the
two more turns needed to complete it.
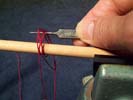
 Now that
we have the slack out, we are ready to begin forming the subsequent
turns of the know. Find one end and pass it round the knot until
you encounter the place where the other end of the cord exits
the knot. Send your selected end alongside that path, retracing
where the other end came from exactly.
Now that
we have the slack out, we are ready to begin forming the subsequent
turns of the know. Find one end and pass it round the knot until
you encounter the place where the other end of the cord exits
the knot. Send your selected end alongside that path, retracing
where the other end came from exactly.
![]()
 It is very
important to stay on one side or the other of the cord you are
following. Having the excess slack out of the knot will be a tremendous
aid to this care, as the knot will support the turns you are weaving
onto the knot. As you notice slack accumulating, stop to work
it out, to maintain a nice supportive shape in the knot.
It is very
important to stay on one side or the other of the cord you are
following. Having the excess slack out of the knot will be a tremendous
aid to this care, as the knot will support the turns you are weaving
onto the knot. As you notice slack accumulating, stop to work
it out, to maintain a nice supportive shape in the knot.
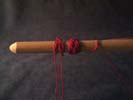
 Now continue
around, the knot acquiring the shape shown at left. When completed
the second turn of the cord all around,the knot should look as
seen at right.
Now continue
around, the knot acquiring the shape shown at left. When completed
the second turn of the cord all around,the knot should look as
seen at right.

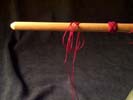
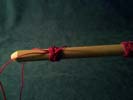 Continue
around the knot for a third turn, completing the knot. The central
knot will be 1/2" in diameter and thus should be built on
a 1/2" dowel form. It will require a fourth turn. After completing
the last turn, tuck the ends under the knots, choosing a position
on the knot to do that so the disappearance will not be noticed
in the pattern.
Continue
around the knot for a third turn, completing the knot. The central
knot will be 1/2" in diameter and thus should be built on
a 1/2" dowel form. It will require a fourth turn. After completing
the last turn, tuck the ends under the knots, choosing a position
on the knot to do that so the disappearance will not be noticed
in the pattern.
Dwain Wilder
![]()
 Home | Hossu
Making |
Design | Contact Us
Home | Hossu
Making |
Design | Contact Us