Installing Frets
Installing frets in the fretboard is a critical operation, requiring accuracy and a consistent touch.

How accurate does one have to be when putting in frets? This question is often answered with a various wild guesses and hunches, but there is a more precise way to answer it. Here is a discussion of the details.
And here is a good Fret Spacing Calculator
 The frets have a toothed tang about .022 inches wide, and I like to set the frets into a slot cut with a hollow-ground .020" wide 4" diameter circular saw (with blade stiffeners), to give them plenty of grip on the fretboard. I built a special jig that fits the miter slot of my table saw and has a locator pin that can be moved in and out, at every distance from the saw blade to a fret position on the fretboard. So I can just set the saw to cut a .070-inch deep slot, put the fretboard on the table saw, move the first pin out and push the end of the fretboard against it, and run the board across the saw blade. This locates frets very quickly, and to within 2 to 4 thousandths of an inch--super-accurate for this length of fretboard.
If you are looking for an accurate way to cut frets for dulcimers you make, check out Bear Meadow Custom Fret Templates.
 I buy fret wire by the pound, in coils. It saves money, but you have to straighten the stuff before it can be installed in the slot. Here's a little jig that Jim Despard, my toolmaker friend, made for the job. It is adjustable, so I can feed it all sizes and shapes of wire. The little bronze tires have a slot to accommodate the tang of the fret wire, so it doesn't wobble through the straightening tool.
 The frets are pressed in, not hammered. Hammering them gives them a chance to bounce right back out (and they'll take the opportunity often!). I made a simple little hand press out of walnut that works just fine. As the length of wire is pressed into a slot, I nip it off with the flush-cutting wire cutters mentioed above.
 After all the slots have been fretted, I go back with a file and trim the ends to a 45 degree angle and dress the edges of the tang flat. For some reason, this file I have will dress up the metal tangs without scratching the fretboard's wood. It's just an old ordinary file, seemingly like any file, but if I ever lose that file my life is going to get a lot more complex.

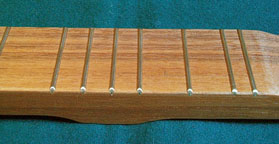
 Here is what the frets look like at this stage. The frets are trimmed and dressed back to a 45-degree angle. After dressing the frets, I put a piece of masking tape along both top edges of the fretboard, covering the frets' ends, and run each edge over a Scotchbrite wheel (when the wheel cuts through the tape I know I've gone far enough on the fret), which burnishes out all the file marks and turns all the sharp edges very nicely and quickly.

