The final stage of installation is to insert the pickup into the body then retrieve it through the small hole in the top. A lot easier than it sounds.
We begin by inserting the pickup's retention thread into the shell using vacuum force.
- To generate the vacuum force we block the treble-side major bout soundhole and one of the minor bout soundholes and apply the hose of a shop vac to to major bout bass-side soundhole (blocking all but one soundhole would create too much stress on the top).
- Make sure the end of your shop vac hose is cleaned of anything that could mar the finish of the top -- lining the hose with masking tape is a good idea.
- With the hose lightly applied to the soundhole, slowly feed the thread through the shell. The vacuum will pick up the thread and move it in the general direction of the soundhole. You can tip the vac hose slightly without interfering much in the vacuum draw, to watch for the emergence of the thread. This usually occurs readily, but you might need to work the thread back and forth in order to catch its end in the flow of air out the soundhole.
- Once the thread's end exits the soundhole, set aside the vacuum hose and pull the thread to a medium tension.
Next, we insert the pickup/output plug assembly.
- Lightly grasping the thread, work the pickup and its signal lead through the shell, being gentle with the 90 degree angle between the pickup and its lead wire.
- Once the plug is in the shell, screw the plug lightly in, keeping gentle tension on the retention thread to keep tangles from forming.
Next step is to grasp the retention thread from inside the dulcimer and conduct it toward the rectangular hole in the top.
- Insert your wire probe into the body through the semi-circular opening in the top of the tailblock and extent it into the body in the general direction of the thread. When you see both the thread and the hook, rotate the hook to engage the thread and pull back slightly.
- Now insert your lamp through the same hole and position it so it is illuminating the small rectangular hole you've made in the top.
- Draw the wire hook back slowly until you can see the thread crossing the hole in the top, still keeping gentle tension on the thread at its exit in the soundhole. You may need to move the hook from side to side slightly to position the thread.
Then we grasp the thread and pull it through the hole.
- When you see the thread in the rectangular hole of the top, reach through with tweezers or the polypus tool and grasp the thread. It will probably be quite near the underside of the top.
- Once you have grasped the thread, let go at the soundhole and pull the thread up through the rectangular hole.
- Remove the lamp, but keep the hook in place. It may be useful to maneuver the tip of the pickup into position.
Now we fish the end of the pickup through the top, using the hook inside and tension on the thread outside.
- Once you have positioned the tip of the pickup into the mouth of the rectangular hole, remove the hook and draw the pickup through the hole. Maneuver the pickup until it is entirely out of the body.
- Remove the tape wrapping and uncoil the retention thread, untie the knot and discard the thread.
- Turn the pickup into the slot and press into its seat.
- Tighten the output plug in its shell. Haemostats are a good tool for this. The outer rim is knurled, to aid with tightening.
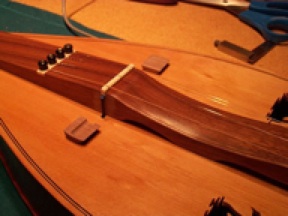
Attend to positioning and setting in the cowlings.
- Position the cowlings and clamp in place using a small clamp, without gluing. Check that the pickup does not bind against the cowlings. Carve away as necessary (but this is hardly ever needed).
- Insert the saddle and check that it is a slip fit, with no binding against the cowlings. If there is any rubbing, lightly file the ends of the saddle to free them within the cowlings.
- Apply glue to the cowlings. I use hot hide glue or liquid fish hide glue for this, diluted to a weak mixture (there's no stress on this joint). Clamp again and allow to set.
This completes the installation. You can re-string, tune-up and test the pickup while the glue finishes setting. Congratulations! If there are questions about tools, techniques or other advice please feel free to Contact Me or call. (See the How to Order page for my phone number.)
Testing the Fit of the Frets