Setting the Interior Cleat
'Laparoscopic' Crack Repair Techniques

Here we describe the rigging necessary to set interior cleats across the crack.
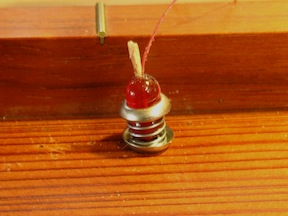
Here is the kit of tools and materials that are used in the setting of the cleat:
- Set of miniature drills, wire # 61-80
- Jeweler's Archimedian drill
- Two feet of beading cord, ends prepared into needle-points
- Round toothpick
- Exterior components:
- Jamb bead
- Jamb bead seat (#4 finish washer)
- Clamp tension spring
- Spring seat (lower jamb bead)
- Lower Jamb beat seat (#4 finish washer)
- Interior components
- Cleat (spruce, beveled edges)
- The cleat is drilled oversize (#60 wire drill) in order to swing freely on the cord, and offset from the center so one side is heavier than the other when hung from the cord)
- Clamp seat (#4 finish washer)
- Extra #4 finish washer
The first step in the process installing a cleat is to decide where the first cleat is to be placed. and measure the distance to the nearest soundhole. Then drill a hole with a No. 75 wird drill (.021) directly into the crack repair (it will be filled and refinished later) where the first cleat is needed. Pass the cord through the hole. Place a vacuum cleaner ose over the nearby sound hole to attract and retrieve the cord back up to the surface. (You may need to block the other sound holses of the instrument with cardboard or some other suitable arrangement to increase the pull of the vacuum on the cord.)
To get the crack edges aligned and clamped, pairs of these magnets are applied along the crack. First the outer surface of the crack is lined with waxed paper, to make sure the surface is not marred by the magnet or any dust picked up by the Teflon cap. The inner magnet is slipped through the soundhole, and captured by a mating capped magnet, and guided to its place along the crack. Depending on the nature and extent of the crack, magnets may be placed about 4 inches away from each other as needed to fully align the to edges of the crack. Light quick-acting clamps can now be applied laterally to the crack as necessary to complete closure.
Once the magnets are stationed and all decisions have been made about staging lateral clamps and magnet clamps, the lateral clamps can be removed and stationed nearby, and magnets moved to one side of the crack and the wax paper lifted and pinned or clamped to allow free movement of the crack while inserting the repair glue. For casual work, cyano-acrylate glue (CA, 'crazy glue,' etc.). For curatorial purposes or work on legacy heritage instruments, liquid fish glue ('LFG') is recommended. The drawback of LFG is also its virtue: it has an 'open time' of about half an hour, but requires clamping for 12 hours for the glue to completely set.
When the joint glue has set, slide the magnets toward the soundhole for withdrawal of the interior magnet. Clean up and refinish the surface as needed. The next step is to install interior reinforcing cleats!
