Installing Wood Pegs
Installing wooden pegs is a simple process, but requires care.
There are lots of different opinions about how to properly dress pegs for the correct combination of "slip" and "drag" to get a smooth yet dependable fit. Here's how I've learned to do it.
 Cut the taper into the peghead with a taper reamer. In the dulcimer, a standard viola taper is just about right. Cut just far enough to accept the small end of the peg about half-way through the far wall of the peghead. Don't try to get the hole cut to full depth at this stage. We got issues to deal with!
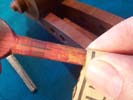
 Test the peg for proper taper. Do this by inserting the peg in the tapered hole and turning it until the hole burnishes a seated "land" on the peg shaft. The peg should seat just a little more thoroughly at the big end than the small end. Using 400-grit sandpaper, adjust by sanding the lands until the small-end land is burnished in the hole a little less heavily than the large-end land.
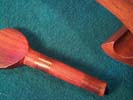
 As you get close to the proper taper, draw pencil lines down length of the peg, spaced at 90 degrees around the shaft. Test the peg to see if the lines are wiped off equally when the peg is twisted in its hole.
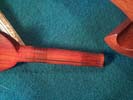
 Adjust with sandpaper until all 4 marks are being wiped about equally in both the large and small lands (with a little more wiping on the small end). If one mark is wiped more than any other, concentrate on taking material off that sector of the shaft.
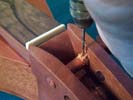
Now carefully finish cutting the taper to the final depth. Before you get quite to where you think the final depth ought to be, withdraw the reamer by twirling it in the cutting direction while gently pulling (never simply stop the reamer and pull it out--you'll put a slice in the wall of the hole, and also may get an out-of-round hole). Gently blow out all dust and clean the reamer. Then re-insert it and firmly turn it in opposite from the cutting direction, to burnish the hole. Now test the depth of the peg in the hole. Make further cuts as necessary to get the depth right.
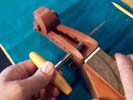
 Trim to a nice finish, then cross-drill for the string. It isn't too important what size drill you use here--1/16" will be fine (you don't want to make it a needle-threading event to get a string on the instrument!).
If necessary, adjust the slip and drag by dressing the peg lands. The best dressing compounds I've found to do this job are Hill's Peg Dope and Hidersine's HiderPaste (both commonly available at stringed instrument shops). First gob the Hill's Peg Dope on the peg lands and work it in by spinning the peg while you apply a polishing pressure with your fingers. You should really heat it up, so it flows a little and works into the wood. Then apply more Hill's, and this time put the peg with the gobs of dope on the lands into the peg's hole in the peghead, coating the holes. Turn the peg vigorously to work the dope into the insides of the hole. Now re-apply more Hill's on the peg and work it into the lands again, raising the heat once more. The object here is to work a generous amount of the peg dope into the wood of the peg and the inside of the hole in the peghead. It isn't necessary to end up with blobs of peg dope everywhere, but don't be sparse in working it into these areas.
Next, wipe off the excess and scribble a few marks of HiderPaste on the peg lands, insert the peg into the peghead and turn vigorously to distribute it. Withdraw, add a final few scribbles to the peg lands, insert and twist. Now your peg should both hold tuning and turn easily at concert pitch.
In the future, when your pegs need conditioning, put on a little Hill's Peg Dope if they are sticking and need to move more smoothly. And if they are getting bad at holding a position and slipping too much, put on a few marks with the HiderPaste.
After stringing up and bringing the instrument to concert pitch, make sure the pegs are still set well and run smoothly. You're done!