Cutting in the Pegbox Interior
The pegbox interior, the slot where the pegs and strings are terminated, is the beginning cut in the new peghead.
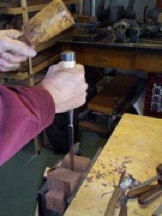
 The first step in carving the interior is to mark out cutting lines with pencil and go over them with a knife to avoid chipping. Then we take up the 1/2" mortise chisel and cut in to begin carving out the peg alley. Make strong blows with the mallet, walking the chisel up between the marks, and keeping between 1/16" and 1/32" away from the boundary, to avoid chip-out. Remember to keep the chisel sharp. It is tempting to simply pound harder and harder with the mallet to drive a mortise chisel, rather than keeping track of the sharpness of your edge.
 Next, we clean out shavings and begin to dress the floor and walls. The floor should be taken down deep enough to allow easy access for mounting the tuner mechanisms you might use. Don't go deeper than necessary, though. I once punched right through the bottom of a peghead from sheer chiseling exuberance! Keep the peg alley walls about 3/8" thick, minimum. That will give you enough purchase for pegs or mechanical tuners, but without much to spare.
 Here we see the roughed-in interior. The floor has gotten pretty clean, but the walls are still rough. We will dress the walls with slant chisels, and continue refining the floor. Also, the open ends of the alley walls will be flared to accommodate the strings which go to the end slots of the nut. Note also that the floor of the alley is relieved below the top of the alley walls, to avoid interfering with the fair lead of the strings.