Final Assembly
 We begin by preparing the top linings. These had been glued on so they stand a little proud of the tops of the ribs, so we can dress them down to a nice seat. Fit a plaster finisher's sanding tool with #80 grit sandpaper and carefully sand the linings down until they are just level with the top edges of the ribs. You can use the shellac sealer as a guide here: as soon as the sealer disappears, you're down to the right place. After you have a good seat, apply a hide glue wash to the seat, and to the lands on the underside of the top also. To make a wash, heat the weak hide glue preparation you are going to use to glue the top, dip your brush in it, then dip again briefly in the hot water bath your glue pot is sitting in. The results on your brush will be a thin wash of hide glue. When you glue the top on later, this wash will keep the glue from penetrating the top and the seats, so you will have a good continuous joint, but one that will come apart readily for repairs, or in case the instrument gets a shock. (You'd rather have the top come bouncing off during a crash, than stay glued firmly to the body and get smashed.)
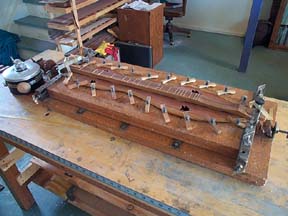
 The completed body is returned to the building mold, ready to receive the top. I cushioning for the top, so it won't get marred by the toggle clamps you see in the photograph. I had Cadillac Plastics make me up some nice soft polypropylene sheet, about 1/16" thick. This, cut into strips, makes an excellent cushion to protect the soft redwood of the top.
 Now we use a weak preparation of hide glue (see the article on Preparing Hide Glue for the specific formulation). We want the top to pop off the body readily in case of a shock to the instrument. Otherwise, if the top is glued to strongly, it might split--converting an easy repair job into a major rebuild of the instrument. Also,we want the top easily removable for repairs in future years. This is one of the major reasons to use a weak hide glue for this joint. After the hide glue is brushed on the tops of the sides and tailblock, the top is laid on and adjusted. I use polypropylene strips about 1/16" thick under the toggle clamps so the top won't be marred.
 Finally, we trim the top back to a fiddle edge. This is done free-hand with a very sharp knife, then the edge is faired with a sanding block, rounded slightly so the edge won't catch on things. The body is done. In such a simple step, our assembly is done.